- Published on
Test What is Testable, and Make Testable What is Not So – Unit Testing Impure Functions in Go
- Authors

- Name
- Mae
Writers discussing Go often explain how to write unit tests but fail to cover more challenging cases. I aim to take you from the very basics of unit testing in Go to the more advanced topics you will encounter when developing real-world applications.
Table of Contents
Your First Unit Test
In Go, a unit test is itself a function that tests another function. The purpose of a unit test is to verify the behaviour of the function you are testing. When Go was developed, the developers built a testing system into the Go executable and created a standard way to write unit tests. go test is the primary command for running tests in Go. go test ./... is likely the most common test command you will run. go test ./... will run all the tests in the current directory and all subdirectories, returning a summary of the results.
The goals of unit testing are to verify the behaviour of a function and ensure that it maintains that behavior as the code changes. It can also be used to report code coverage, which is a measure of how much of your code is covered by tests. High code coverage is often an indicator of good code quality, but it is not a guarantee.
Lets start with a trivial function that sums the first n numbers.
func SumN(n int) (int, error) {
    if n < 0 {
        return 0, fmt.Errorf("n must be greater than or equal to 0")
    }
    return (n + 1) * n / 2, nil
}
The most basic unit test looks like this:
package yourpackage

import (
    "testing"
)

func TestSumN(t *testing.T) {
    input := 2
    expected := 3
    result, _ := SumN(2)
    if result != expected {
        t.Errorf("SumN() = %v; want %v", result, expected)
    }
}
Test functions must start with Test and be in a file that ends with _test.go. This is a special convention that tells the Go compiler that this file contains tests. In additions to the Test function convention, there are also Examples, Benchmarks, and Fuzz tests, if you are interested in learning more check the documentation. Lastly, it's useful to know that you can build your tests without running them.
go test -c -o test-binary
./test-binary
Once you've built the test, you can move it to another machine to run it. With the cross-compiling support of Go you can build Linux test binaries on macOS, and vice versa.
You can also perform black-box testing by appending _test to the package clause, such as package yourpackage_test. When conducting black-box testing, you cannot access unexported fields, which forces you to use the public API of the package. This helps ensure the integrity of your external API. I'd suggest you use this approach whenever possible, as it will help you avoid testing implementation details.
The test function must take a pointer to testing.T as its only argument. It's common to set up your expectations as variables at the top of the test function before calling the function you are testing. You should familiarize yourself with the testing package, as everything is built on top of it.
If you want to report your line-level coverage, you can use the -cover flag.
go test -coverprofile=coverage.out ./...
# Followed by
go tool cover -func=coverage.out
# Output:
# example.com/m/func.go:12:                       SumN                            100.0%
# example.com/m/func.go:31:                       NewService                      0.0%
# example.com/m/func.go:47:                       ProcessFile                     85.7%
# example.com/m/func.go:68:                       ProcessReportTitles             100.0%
# [...]
# total:                                          (statements)                    32.7%
You can also use HTML to view the coverage in a browser. I will not belabour these details but you can see the details with go tool cover -help. The coverage.out file is simple to understand, consider taking a look to demystify it or to develop further tools to make use of it.
Unit Tests in Practice
Many Go projects use a testing library like require or assert, which are part of testify. The reason for using assert/require is that they simplify the conditions we check. For example, instead of writing:
if result != expected {
    t.Errorf("SumN() = %v; want %v", result, expected)
}
You can write:
require := require.New(t)
require.Equal(expected, result)
With require and assert, you will find many useful functions that help you quickly compare expectations and actuals. require.NoError(err) is a common pattern in tests that simplifies error handling.
More frequently, you will find that you want to test a function with multiple sets of inputs and outputs. In this case, we often use a table-driven test. There is nothing special about table-driven tests; it is just a common pattern. Start with a structure that contains the input, outputs, and any other flags you need. We will discuss the flags more later. It is also valuable to create a name that uniquely identifies the test.
func TestSumN(t *testing.T) {
	t.Parallel()
	require := require.New(t)

	testCases := []struct {
		name        string
		input       int
		expected    int
		errExpected string
		hasError    bool
	}{
		{
			name:     "Test 1",
			input:    1,
			expected: 1,
		},
		{
			name:     "Test 2",
			input:    2,
			expected: 3,
		},
		{
			name:        "Test 3",
			input:       -1,
			expected:    0,
			hasError:    true,
			errExpected: "n must be greater than or equal to 0",
		},
	}

	for _, tc := range testCases {
		t.Run(tc.name, func(t *testing.T) {
			t.Parallel()

			result, err := SumN(tc.input)
			require.Equal(tc.expected, result)
			// Error is expected
			if tc.hasError {
				require.EqualError(err, tc.errExpected)
			} else {
				require.NoError(err)
			}

		})
	}
}
This may look verbose, but you will notice that it's very easy to add new test cases, and that if broken into three tests, it would actually be longer. The t.Run function is a way to run subtests. It takes a name and a function. The name is used to identify the test in the output. When running tests, a subtest can be run on its own with the -run flag, like this:
go test -v -run '^TestSumN/Test_1$'
We demonstrate the use of t.Parallel(), which allows the test to run in parallel with other tests. t.Parallel() informs the Go test framework that this test can run concurrently with other tests. It must be the first line in the test function.
The function we tested above is a pure function, meaning it has no side effects and does not depend on any external state. This makes unit testing extremely straightforward. Examples of impure functions include make network requests, write or read from files, use time, randomness, or global variables. In reality, we often have to deal with functions that are not pure.
Testing Impure Functions
Most of the interesting code you are unit testing will utilize complex modules. Common examples include network resources, such as databases or API calls. You might also have a complex service that you want to test in isolation. For example, a routine that downloads a file, processes it, and then sends a message to a message broker. The challenge with this is that you likely won't have access to the actual services behind the API calls when running the test. Even if you could access the service, you may not want to spam it with requests or set up the proper state for the test.
These are often the cases that Go tutorials fail to explain. I will try to provide you with the tools you need to test these scenarios.
Testing with Dependency Injection
Dependency injection is a common pattern in Go. It allows you to inject dependencies into your code rather than hardcoding them.
This may sound like a fancy term, but what it really means is that you define the behavior of your code in terms of interfaces. Then, when you start your program, you "inject" the implementation of the interface into your code.
When designing your code, you should always think about how you will test it.
You should consider your resources, such as databases, network resources, or system resources like the file system, as interfaces.
This benefits you in two ways: first, it makes testing much easier, and second, it allows you to swap out the implementation of the interface for a different one.
This can be extremely valuable if you start development with a simple implementation and later want to swap it out for a more complex implementation that has better performance. Because your code is designed around an interface, you can swap out the implementation without changing the code that uses the interface.
 Ideally, you should design your code so that you access your services through interfaces.
You should define your interfaces in the consuming package, not where the implementation resides. This allows you to create implementations without modifying the consuming package.
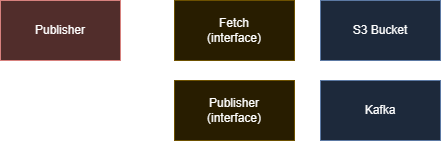
Let's quickly create the required interfaces. We only need two methods in the Fetcher interface: one that fetches a specific file and another that fetches a list of files. For the Publisher interface, we only need one method, which publishes a message.
type Fetcher interface {
    FetchFile(ctx context.Context, file string) (io.Reader, error)
    ListFiles(ctx context.Context) ([]string, error)
}
type Publisher interface {
    Publish(ctx context.Context, message any) error
}
Notice that our interfaces don't describe our intended implementation, just the required methods to be implemented.
Now we can create our service. We will use the Fetcher and Publisher interfaces to fetch files and publish messages.
// NewService is a constructor for the service, it allows the main function to inject the dependencies.
func NewService(fetcher Fetcher, publisher Publisher) *Service {
	return &Service{
		fetcher:   fetcher,
		publisher: publisher,
	}
}

// Service is our type which holds the dependencies.
// Notice we are using unexported fields for the interfaces.
// Unexporting fields prevent other packages from modifying them.
type Service struct {
	fetcher   Fetcher
	publisher Publisher
}

// ProcessFile is our main function which fetches a file and publishes a message.
func (s *Service) ProcessFile(ctx context.Context, file string) error {
	// Fetch the file
	reader, err := s.fetcher.FetchFile(ctx, file)
	if err != nil {
		return err
	}
	// Process the file
	data, err := io.ReadAll(reader) // Just an example, you would do something with the file here
	if err != nil {
		return fmt.Errorf("failed to read file: %w", err)
	}
	// Publish a message
	return s.publisher.Publish(ctx, data)
}
In our main function, we would create the service and pass in the dependencies. These would be the real, or concrete, implementations of the interfaces. A concrete implementation is a type that can be instantiated and used. Unlike an interface, which cannot be instantiated, and has no implementation. In Go a concrete type is typically a struct. These implementations are left as an exercise to the reader, but the important part is they implement the interfaces we defined above. Your NewS3Fetcher and NewKafkaPublisher functions would return the concrete implementations of the Fetcher and Publisher interfaces. Returning an interface prevents the caller from accessing the exported fields of the struct which can be annoying.
func main() {
    // Create the fetcher and publisher implementations
    fetcher := NewS3Fetcher()
    publisher := NewKafkaPublisher()

    // Create the service
    service := NewService(fetcher, publisher)

    // Process a file
    err := service.ProcessFile(context.Background(), "file.txt")
    if err != nil {
        log.Fatalf("failed to process file: %v", err)
    }
}
It's often a good idea to create a context for functions that access network resources, as you may wish to cancel the request early, which will terminate running functions that support contexts. In the caller of ProcessFile, you would create a context with a timeout and pass it to the function.
ctx, cancel := context.WithTimeout(context.Background(), 5*time.Second)
defer cancel()
err := service.ProcessFile(ctx, "file.txt")
Passing the context via the first argument of the function is the common pattern. You cannot pass a context using a field, as the context should only live for the duration of the function call.
You can think of a context as a way to pass values and cancellation signals through your code.
Testing the Service
Now we can create a test for our service. We will create mock implementations of the Fetcher and Publisher interfaces.
A mock is just a replacement of the real implementation that simulates the behavior of the real implementation. Often a mock can be just an in-memory implementation of the service it is mean to simulate. Other times the mock just verifies the input matches the expected input, and returns a fixed script of outputs.
Let's start by creating implementations of the Fetcher and Publisher interfaces. These implementations use unexported fields to maintain state across multiple calls if needed. If an error is to be simulated (and returned), it must also be stored in the struct, so that the methods defined can return the error.
If your mock implementation is simple you can forgo the struct and just use a function, however it arguably is less flexible.
type MockFetcher struct {
    files map[string]string
    err   error
}

func (m *MockFetcher) FetchFile(ctx context.Context, file string) (io.Reader, error) {
    if m.err != nil {
        return nil, m.err
    }
    if data, ok := m.files[file]; ok {
        return strings.NewReader(data), nil
    }
    return nil, errors.New("file not found")
}

func (m *MockFetcher) ListFiles(ctx context.Context) ([]string, error) {
    if m.err != nil {
        return nil, m.err
    }
    files := make([]string, 0, len(m.files))
    for file := range m.files {
        files = append(files, file)
    }
    return files, nil
}

type MockPublisher struct {
    err error
}

func (m *MockPublisher) Publish(ctx context.Context, message any) error {
    return m.err
}
When you make these mocks yourself you need to record and validate inputs and set outputs manually. But I'll show you an arguably better way later.
For our test functions, notice we use the method convention, where there is a _ between the type name and the method name. When you write an example with this convention the test will appear in the example section of the documentation when using the godoc system.
func TestService_ProcessFile(t *testing.T) {
    t.Parallel()

    testCases := []struct {
        name          string
        file          string
        mockFetcher   *MockFetcher
        mockPublisher *MockPublisher
        expectedError string
    }{
        {
            name: "Successful file processing",
            file: "file1.txt",
            mockFetcher: &MockFetcher{
                files: map[string]string{
                    "file1.txt": "file content",
                },
            },
            mockPublisher: &MockPublisher{},
        },
        {
            name: "Fetcher returns error",
            file: "file1.txt",
            mockFetcher: &MockFetcher{
                err: errors.New("fetcher error"),
            },
            mockPublisher: &MockPublisher{},
            expectedError: "fetcher error",
        },
        {
            name: "Publisher returns error",
            file: "file1.txt",
            mockFetcher: &MockFetcher{
                files: map[string]string{
                    "file1.txt": "file content",
                },
            },
            mockPublisher: &MockPublisher{
                err: errors.New("publisher error"),
            },
            expectedError: "publisher error",
        },
    }

    for _, tc := range testCases {
        tc := tc // capture range variable
        t.Run(tc.name, func(t *testing.T) {
            t.Parallel()

            service := &Service{
                fetcher:   tc.mockFetcher,
                publisher: tc.mockPublisher,
            }

            err := service.ProcessFile(context.Background(), tc.file)
            if tc.expectedError != "" {
                require.Error(t, err)
                require.Contains(t, err.Error(), tc.expectedError)
            } else {
                require.NoError(t, err)
            }
        })
    }
}
Great, we tested our service with mock implementations of the Fetcher and Publisher interfaces.
Testing with a Mock Generation Library
There are generators for Go that will create mocks for you. One of the earliest tools developed for this purpose is gomock. Note that Uber took over the project from Google, and it is now maintained by Uber. The alternative to gomock is mockery. Once you have installed mockgen, you can generate mocks for your interfaces.
Instead of running it from the command line or a Makefile, you can use a special comment in your code to generate the mocks.
//go:generate mockgen -destination=./mocks/mock_fetcher.go -package=mocks . Fetcher
//go:generate mockgen -destination=./mocks/mock_publisher.go -package=mocks . Publisher
I typically put this directly above the interface definition, but you can put it anywhere in the file.
You can then use go generate to generate the mocks.
go generate ./...
This will create a mocks directory in the same directory as the file with the interface definition.
Once you have the mocks, you can use them in your tests.
import (
    "github.com/golang/mock/gomock"
    "yourpackage/mocks"
)

func TestService_ProcessFile_Mocks(t *testing.T) {
	t.Parallel()

	// Creates a new gomock controller, used to handle the lifecycle of the mocks
	ctrl := gomock.NewController(t)
	defer ctrl.Finish()

	// Create a new mock fetcher and publisher, like the mock implementations we created earlier
	mockFetcher := mocks.NewMockFetcher(ctrl)
	mockPublisher := mocks.NewMockPublisher(ctrl)

	testCases := []struct {
		name string
		file string
		// mockSetup is a function that sets up the mock expectations, because the expectations
		// are different for each case, it is handy to have a function for each case that sets up the expectations
		// The other way to handle this is using boolean flags, but I've found this to be more readable.
		mockSetup     func()
		expectedError string
	}{
		{
			name: "Successful file processing",
			file: "file1.txt",
			mockSetup: func() {
				mockFetcher.EXPECT().FetchFile(gomock.Any(), "file1.txt").Return(strings.NewReader("file content"), nil)
				mockPublisher.EXPECT().Publish(gomock.Any(), []byte("file content")).Return(nil)
			},
		},
		{
			name: "Fetcher returns error",
			file: "file1.txt",
			mockSetup: func() {
				mockFetcher.EXPECT().FetchFile(gomock.Any(), "file1.txt").Return(nil, errors.New("fetcher error"))
			},
			expectedError: "fetcher error",
		},
		{
			name: "Publisher returns error",
			file: "file1.txt",
			mockSetup: func() {
				mockFetcher.EXPECT().FetchFile(gomock.Any(), "file1.txt").Return(strings.NewReader("file content"), nil)
				mockPublisher.EXPECT().Publish(gomock.Any(), []byte("file content")).Return(errors.New("publisher error"))
			},
			expectedError: "publisher error",
		},
	}
	for _, tc := range testCases {
		tc := tc // capture range variable
		t.Run(tc.name, func(t *testing.T) {
			t.Parallel()

			// Call the mock setup function to set up the expectations
			tc.mockSetup()

			service := &Service{
				fetcher:   mockFetcher,
				publisher: mockPublisher,
			}

			err := service.ProcessFile(context.Background(), tc.file)
			if tc.expectedError != "" {
				require.Error(t, err)
				require.Contains(t, err.Error(), tc.expectedError)
			} else {
				require.NoError(t, err)
			}
		})
	}
}
That might look like more, but when you consider that you didn't need to write the mocks yourself, it ends up being less code to maintain. For interfaces with many methods, this can be a huge time saver.
This approach is by far the best approach for testing complex services. It allows you to test your code in isolation without needing to set up the entire service. It also allows you to test edge cases that would be difficult to reproduce with a real service.
Adding Testability to Existing Untested Code
Okay, so you don't have the ideal circumstances. We have a function we want to test that is not pure, and we don't have an existing interface to inject the dependencies. This is most likely to occur in packages that were not written with testing in mind.
I have a few strategies that I've used to deal with this.
Extract Side Effects for Testability
Extracting the part of the function with side effects is often the simplest solution. Often a function may be doing a single statement with side effects, an impure statement, like an HTTP request followed by some processing of the result. To increase the coverage of the function, you can move the statement with side effects out of the function and pass the results to the function. Let's show an example with an HTTP request that is impure.
func ProcessReportTitles(path string) ([]string, error) {
    resp, err := http.Get(path)
    if err != nil {
        return nil, err
    }
    defer resp.Body.Close()

    var data []Resource
    if err := json.NewDecoder(resp.Body).Decode(&data); err != nil {
        return nil, err
    }
    var titles []string

    // Filter the report.
    for _, resource := range data {
        if resource.Type == "report" {
            titles = append(titles, resource.Title)
        }
    }

    return titles, nil
}
This function is not pure because it makes an HTTP request. We can refactor this to make it pure by moving the HTTP request out of the function. We start by introducing a new function that takes an io.Reader as an argument. This allows us to pass in any data source, including an HTTP response body.
func ProcessReportTitles(stream io.Reader) ([]string, error) {
    var data []Resource
    if err := json.Decoder(stream).Decode(&data); err != nil {
        return nil, err
    }
    var titles []string
    // Filter the report.
    for _, resource := range data {
        if resource.Type == "report" {
            titles = append(titles, resource.Title)
        }
    }

    return titles, nil
}
Now, we can create a function that makes the HTTP request and calls the pure function.
func FetchAndProcessReportTitles(path string) ([]string, error) {
	resp, err := http.Get(path)
	if err != nil {
		return nil, err
	}
	defer resp.Body.Close()

	return ProcessReportTitles(resp.Body)
}
Now we can test the pure part of the function without needing to make an HTTP request.
func TestProcessReportTitles(t *testing.T) {
	t.Parallel()
	require := require.New(t)

	testCases := []struct {
		name        string
		input       io.Reader
		expected    []string
		errorString string
	}{
		{
			name:     "Valid JSON",
			input:    strings.NewReader(`[{"type": "report", "title": "Report 1"}, {"type": "other", "title": "Other 1"}]`),
			expected: []string{"Report 1"},
		},
		{
			name:        "Invalid JSON",
			input:       strings.NewReader(`invalid json`),
			errorString: "invalid character 'i' looking for beginning of value",
		},
	}

	for _, tc := range testCases {
		t.Run(tc.name, func(t *testing.T) {
			t.Parallel()

			result, err := ProcessReportTitles(tc.input)
			if tc.errorString != "" {
				require.EqualError(err, tc.errorString)
			} else {
				require.NoError(err)
				require.Equal(tc.expected, result)
			}
		})
	}
}
Upsides:
- This is a simple solution that can quickly be applied to many functions.
Downsides:
- It's not always possible to make the function pure; often, the function may conditionally use statements with side effects.
- It can become needlessly complex if the function has multiple statements with side effects.
- It makes the caller's life difficult since they have to manage and call the impure function themselves.
The most common use of this pattern is with time. Often, you may want to use time.Now() in your code, but time.Now() is not pure. Instead, you can just pass now time.Time to the function.
Put the Function Dependency in Method's Struct
If your using a method and not a function you can use the struct to hold the dependencies. This can be used to mock the time.Now function.
type Processor struct {
    now func() time.Time
}
func (p *Processor) ProcessReportTitle(resource Resource) (string, error) {
    if resources.CreatedTime.After(p.now()) {
        return nil, fmt.Errorf("resource is from the future")
    }

    return resource.Title, nil
}
In the test, you can pass a function that returns a fixed time.
p := &Processor{
    now: func() time.Time {
        return time.Date(2020, 1, 1, 0, 0, 0, 0, time.UTC)
    },
}
In your production code, the constructor would assign the time.Now function pointer.
func NewProcessor() *Processor {
    return &Processor{
        now: time.Now,
    }
}
Upsides:
- This is a simple solution that can quickly be applied to many functions.
- It is easy to add to an existing method.
Downsides:
- It doesn't scale to complex resources.
Pass the Necessary Function Dependencies As Arguments
This is messier than using struct-based dependency injection, but it has the advantage of not needing to create a struct to hold the dependencies. Here is an example using a passed function for time.Now().
func ProcessReportTitle(resource Resource, now func() time.Time) (string, error) {
    if resources.CreatedTime.After(now()) {
        return nil, fmt.Errorf("resource is from the future")
    }

    return resource.Title, nil
}
As you can see, we were able to pass the time function as an argument. This allows us to test the function without needing to mock the time package, which would require defining a type to implement the interface.
In the test, you can pass a function that returns a fixed time. In your production code, you can pass time.Now (notice the lack of parentheses).
ProcessReportTitle(resource, time.Now)
Upsides:
- Again, for simple functions, this can be a quick solution.
Downsides:
- Not easy to manage for complex functions.
- Makes the function signature much more complex since functions are verbose.
- Makes the caller's life more difficult since they have to pass the function as an argument.
Using a Global Variable to Control Which Function is Called
This is not generally recommended because it prevents you from running your tests in parallel. It is also not easy to reason about since the variable will appear to come from nowhere.
Again, this is commonly used with time.
var nowFunc = time.Now

func ProcessReportTitle(resource Resource) (string, error) {
    if resources.CreatedTime.After(nowFunc()) {
        return nil, fmt.Errorf("resource is from the future new")
    }

    return resource.Title, nil
}
In the test, you would replace the global variable function.
Upsides:
- Very easy to implement.
Downsides:
- Relies on a global variable, which is difficult to reason about.
- Prevents parallel tests.
- Doesn't scale well.
- Confusing to read.
Running the Real Service Locally
Sometimes the best solution is to just use the real thing—or at least a facsimile of the real thing. With the popularization of Docker, a developer can run real services in a container. This allows you to test against real services without needing to mock them. This is often the best solution since it will be the most accurate.
I've found success using Docker with RabbitMQ, PostgreSQL, S3 (via minio), and custom in-house microservices.
However, the containers need to be up and running before the tests are run. This can be done with a Makefile or in GitHub Actions using a service container.
You will likely need to set up some prerequisites, like creating a schema in a database, creating topics for a message broker, or creating data in a datastore. It would benefit you to set up the prior state from a custom function.
Depending on you requirements you will want to consider both the local experience and a CI experience. You should have a script or Makefile that sets up the local environment. This should be run before running the tests. To prevent the tests from running without the services running, you can use build tags to separate your tests without outside dependencies and those with outside dependencies.
In your test file, at the top:
// +build integration
package yourpackage
The running the tests with the integration tag will look like this:
DATABASE_PASSWORD=dbpass1 go test -tags=integration ./...
I'd suggest that you have Makefile targets for setting up the local environment, running the tests, and tearing down the local environment.
.PHONY: setup test teardown
setup:
    docker compose up -d
test:
    DATABASE_PASSWORD=dbpass1 go test -tags=integration ./...
teardown:
    docker compose down
If set up with docker compose, you'll find the experience to be fairly seamless. However, you can use Docker commands directly if you prefer. Your test will be defined similarly to previous examples, but you will be using the real service, consuming any required credentials from the environment.
// +build integration
package yourpackage

func TestPostgresConnection(t *testing.T) {
    t.Parallel()

    // Get the database password from the environment variable
    dbPassword := os.Getenv("DATABASE_PASSWORD")
    if dbPassword == "" {
        t.Fatal("DATABASE_PASSWORD environment variable is not set")
    }

    // Define the connection string
    connStr := fmt.Sprintf("host=localhost port=5432 user=postgres password=%s dbname=testdb sslmode=disable", dbPassword)

    // Open a connection to the database
    db, err := sql.Open("postgres", connStr)
    if err != nil {
        t.Fatalf("Failed to open database connection: %v", err)
    }
    defer db.Close()

    // Ping the database to ensure the connection is valid
    if err := db.Ping(); err != nil {
        t.Fatalf("Failed to ping database: %v", err)
    }

    // Set up the database schema and data
    setupDatabase(t, db)

    // Do more with the database connection, like running queries
    // Or testing your functions that use the database connection
}
Benefits:
- You are testing against the real service, so you can be sure that your code works with the real service.
- If your mocks are not accurate, the real service will catch the errors.
Downsides:
- These are not really unit tests.
- A lot of setup is required to run the tests.
- You need to manage the state of the service before and after the tests.
Regardless of the downsides, I've found the use of Docker to mock services extremely effective at finding problems quickly before they reach production. These are likely to be way faster then full blown integration tests, with similar levels of confidence.
Using a Purpose Built Mocking Library
Some libraries are designed to mock specific services.
sqlmock
sqlmock is a library that allows you to create mocks for SQL databases. It can be used to test your SQL queries without needing to connect to a real database.
This relies on the fact that you are using the database/sql package, which is a standard library package for Go. Even if you are using a different database library, you can often use sqlmock to create a mock database connection. Here is an example of using sqlmock with the popular ORM gorm.
import (
    "testing"

    "github.com/DATA-DOG/go-sqlmock"
    "github.com/stretchr/testify/require"
    "gorm.io/driver/postgres"
    "gorm.io/gorm"
)

func SelectReportTiles(context.Background(), db *gorm.DB) ([]string, error) {
    var titles []string
    err := db.Table("reports").Select("title").Where("type = ?", "report").Scan(&titles).Error
    if err != nil {
        return nil, err
    }
    return titles, nil
}

func TestGormWithSqlMock(t *testing.T) {
    t.Parallel()
    require := require.New(t)

    // Create a new sqlmock database connection
    db, mock, err := sqlmock.New()
    require.NoError(err)
    defer db.Close()

    // Create a new gorm DB instance with the sqlmock connection
    gormDB, err := gorm.Open(postgres.New(postgres.Config{
        Conn: db,
    }), &gorm.Config{})
    require.NoError(err)

    // Define your mock expectations
    mock.ExpectQuery("SELECT title FROM reports WHERE type = 'report'").
        WillReturnRows(sqlmock.NewRows([]string{"title"}).AddRow("Report 1"))

    // Call your function that uses gorm
    titles, err := SelectReportTiles(context.Background(), gormDB)
    require.NoError(err)
    require.Equal([]string{"Report 1"}, titles)

    // Ensure all expectations were met
    err = mock.ExpectationsWereMet()
    require.NoError(err)
}
Notice we did not need to create a mock for the gorm.DB type; we just used the sqlmock.New() function to create a mock database connection. This is because gorm uses the database/sql package under the hood, so we can use sqlmock to create a mock database connection.
httpmock
Similarly to sqlmock, httpmock allows you to create test servers that can be used to test your HTTP requests. This is useful for testing your HTTP clients without needing to connect to a real server. Libraries that use HTTP under the hood can also be mocked using httpmock, such as S3.
import (
	"io"
	"testing"

	"github.com/aws/aws-sdk-go/aws"
	"github.com/aws/aws-sdk-go/aws/credentials"
	"github.com/aws/aws-sdk-go/aws/session"
	"github.com/aws/aws-sdk-go/service/s3"
	"github.com/jarcoal/httpmock"
	"github.com/stretchr/testify/require"
)

func TestS3GetObjectWithHttpMockV1(t *testing.T) {
	t.Parallel()
	require := require.New(t)

	// Activate httpmock on the default HTTP client
	httpmock.Activate()
	defer httpmock.DeactivateAndReset()

	// Mock response body
	mockResponse := `{"key": "value"}`

	// Register a responder for the expected S3 URL
	httpmock.RegisterResponder(
		"GET",
		"http://s3.amazonaws.com/my-bucket/my-key",
		httpmock.NewStringResponder(200, mockResponse),
	)

	// Create AWS session with static credentials and custom endpoint
	sess, err := session.NewSession(&aws.Config{
		Region:           aws.String("us-east-1"),
		Endpoint:         aws.String("http://s3.amazonaws.com"),
		S3ForcePathStyle: aws.Bool(true), // Needed to match the mock URL structure
		Credentials: credentials.NewStaticCredentials(
			"test-access-key",
			"test-secret-key",
			"test-session-token",
		),
	})
	require.NoError(err)

	// Create S3 client
	svc := s3.New(sess)

	// Prepare the GetObject input
	input := &s3.GetObjectInput{
		Bucket: aws.String("my-bucket"),
		Key:    aws.String("my-key"),
	}

	// Perform the GetObject call
	output, err := svc.GetObject(input)
	require.NoError(err)
	defer output.Body.Close()

	// Read and verify the response body
	body, err := io.ReadAll(output.Body)
	require.NoError(err)
	require.Equal(mockResponse, string(body))
}
However, this doesn't work with the newer AWS SDK v2. The newer SDK uses a different approach to HTTP clients, and you will need to use a different library to mock the HTTP requests. Therefore, you are better off using a strategy like dependency injection and creating an interface for the S3 client.
type S3Client interface {
    GetObject(input *s3.GetObjectInput) (*s3.GetObjectOutput, error)
}
You'll notice that the above is a subset of the full S3 client. Its not necessary to mock the entire client, just the methods you are using.
Mocking Filesystems using a Different Base Path
A common issue that may occur is that you wish to test filesystem operations, but you don't want to use the real filesystem which may vary from system to system.
Consider this code that reads the /opt/etc/ directory to read a configuration file. Often, the developer will not want to pollute their real filesystem with test files.
func ReadConfigFromYaml() (map[string]string, error) {
    file, err := os.Open("/opt/etc/config.yaml")
    if err != nil {
        return nil, err
    }
    defer file.Close()

    config := make(map[string]string)
    if err := yaml.NewDecoder(file).Decode(&config); err != nil {
        return nil, err
    }

    return config, nil
}
If trying to test this code its better to pass the path of the file as an argument. This allows you to pass a different path for testing.
However, if you have many files you want to read that are under some path, even / it can be helpful to set a base path and then append the file path to that base path. This could be useful if you have credential files, configuration files, file storage paths, ect...
func ReadConfigFromYaml(basePath string) (map[string]string, error) {
    file, err := os.Open(path.Join(basePath, "config.yaml"))
    [...]
}
The caller would then use a global constant for the base path, and the test would use a different base path.
The test could then setup the directory structure in a temporary directory like /tmp/ (made with os.MkdirTemp) and then pass that base path to the function. Also, because MkdirTemp is guaranteed to be unique, you can run the test in parallel without worrying about collisions.
const BasePath = "/opt/etc/"

func main() {
    config, err := ReadConfigFromYaml(BasePath)
    if err != nil {
        log.Fatalf("failed to read config: %v", err)
    }
    fmt.Println(config)
}
For configs specifically you are better off using a command line argument or environment variable to set the configuration path.
But this is just another common strategy that can be used to test code that uses the filesystem.
Test Driven Development
When developing a new feature, you can consider writing your tests first. This is called test-driven development (TDD). The idea is to write the tests first, then write the code to make the tests pass. This can be a great way to ensure that your code is testable and that you are writing the correct code. One benefit of TDD is that it forces you to think about the design of your code before you write it. This can help you avoid writing code that is difficult to test.
If I feel like a function is going to be difficult to implement I often start with the function signature, then start writing tests. Once I have covered the tests I want to write, I start implementing the function. Also once you have a working solution it allows you to refactor the code without worrying about breaking it. This is because you have tests that will catch any regressions. This is also useful when trying to optimize legacy code, instead of trying to change the code while maintaining existing behaviour, you can write tests that cover the existing behaviour, then start refactoring the code. This is sometimes idealistic, but I believe it will help you feel more confident in your code.
Conclusions
Unit testing in Go can often be difficult to implement, but with the previously stated strategies, you should be able to test most of your code. The most important thing to remember is to design your code with testing in mind. This will make your life much easier when it comes time to write tests. Think about how the code will be used, maintained, and read. Your code will be read far more often than it is written, so make it easy to read.